Feeds:
Posts
Comments

Adventures in Varnish Repair

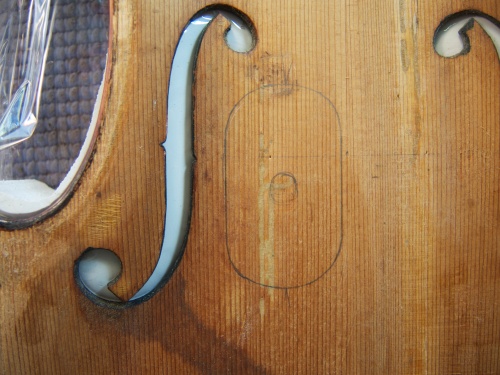
Recently I accepted a challenge. Here’s a violin made by Cesare Castelli in Ascoli Piceno, 1964. It had been well maintained, clearly taken care of and showing only light wear in all the places one might expect, except for this nastiness on the lower back:

Ouch, that’s an eyesore! This is a retouch job that would be hard to pull off for reasons I will explain. So I went for it.

Many years ago, my teacher wisely implored his students not to take on a retouch problem if we were not confident that we could seriously improve what was already there. Good advice I think. Being a teacher now myself, I try to expand on this idea by emphasizing the importance of analyzing a problem first, in order to recognize the challenges and make a realistic assessment of the likelihood of success. No one’s talking about perfection here. Perfection does not exist. And if you think it does, it will freeze you in your tracks. We try to get as close as possible though.

Several things make this square inch of tortured violin real estate problematic in terms of varnish restoration.

First, the overall look of the violin is uniform. The varnish is not shaded or antiqued in any way, either by time or design. The color is light, favoring yellow and orange, and very transparent. There are no other evident repairs to this instrument. In all, there is very little to visually distract from the injury on the back. This means there will also be very little to distract from the newly improved retouching.

When scoping out a potential retouch job, I will always look for visual characteristics that I can use to subtly hide or deemphasize the repaired area. An easier retouching project might be darker in color, with prominent grain lines, lots of patina and plenty of visual features like flecks, rays and blemishes. This violin doesn’t leave me much to work with.

Additionally, and unfortunately, the damage is deep and ragged. Someone has attempted to what, fix it? maybe with a burn in shellac stick? Whatever. All that garbage has to come out first before any new materials are applied. I am at least thankful that the original varnish surface isn’t terribly textured and the level of gloss shouldn’t be too hard to replicate.

I always start with cleaning the instrument as a way to get to know what I am looking at as a whole. Most importantly and specific to the area I’m retouching, I don’t want to embed any dirt or grime as I apply new materials. Removing the old “retouching” was done mechanically. I found that I could pick out the old dark bits with a dental pick, knife tip and even a short length of e string stuck in the end of a bit of soundpost material. Thankfully there was nothing really embedded in the wood. I supplemented with a soft brush and de-ionized water to keep the unwanted bits flushed away and to keep the wood fibers raised.

With the well- intentioned but visually reprehensible garbage removed, I knew I would be facing the next problem. The depth of the damage would require filling and the torn and ragged wood fibers would inevitably cast micro shadows that would make me very unhappy later on. Normally I would probably just drop in varnish filler and rely on color and opacity to cover the tracks, but because of the light and transparent varnish, I decided to judiciously remove some wood to smooth out the bottom of my retouching area and minimize or soften the micro shadows that might be cast there.

A light clear glue sizing followed. Then, when dry, a little burnishing and shellac sealer prepared the area for the varnish filler and color that I hoped would level the area while allowing the wood itself to reflect through.

I began dropping my filler varnish into the bottom of the cavity I’d created. The filler is my retouch varnish, a bit on the thick side, with aluminum hydroxide added for bulk. It was crucial to maintain the transparency of the filler, so I was careful not to add too much aluminum hydroxide which can make a varnish cloudy if used in excess. Still, several applications were required. In between coats, I carefully leveled the driedfiller with a scraper and micromesh, and then buffed lightly with tripoli and water to keep my retouch area approximately equal in luster to the surrounding area as I went along. My intention was to fill and level the void in the wood with clear varnish and then build colored varnish on top to match the original.

Color then, was added in tiny increments from a relatively dry palette. With so very few variants in my visual field to work with, I relied mainly on transparent anilines to establish an accurate and fairly consistent color match (really an undulating mix of three or four colors), building slowly, and sealing lightly on occasion.

A bit more filler was added mid way.

There’s not really an adequate way to describe this process. It’s layering, it’s building, it’s knowing how fast and how far you can work without ruining what you’ve done with that last stroke of a brush. It’s figuring out how to keep the area visually lively without it throwing a punch to your little eye.

In my view, the color coats are the fun part. But the job isn’t done until it’s well sealed with a protective coat that matches the original in texture and luster. Several sealer coats secured the color work and the final blending was worked out with a fine scraper, micromesh, fine abrasive compounds and oil, and a careful French polish.

So many choices are made in the course of retouching, and it’s all predicated on the notions of layering and small increments of change. I am convinced that successful retouching is less about the specifics of pigments, varnishes and brushes, and more about how well one knows the materials one is using, and how one chooses to use them.

One Morning, that Morning

IMG_2045

Today, I am up a little earlier than usual. It’s Monday, and since I worked a long day on Saturday, I could consider today, my Sunday. Often, I do.

Not everything is shaped liked a violin – pretty close though , if one applies a metaphorical kind of Golden Ratio to the machinations of an ordinary life. In my case, the Dog wins out today, as the balance has shifted away from the backlog of work, which will still be there for me on Tuesday, which is my Monday. We hit the trail.

IMG_2040

It’s been raining. And while that is not unheard of for December in Massachusetts, it’s a little suspect, and rankles, given that our first serious snowfall happened nearly a month ago.

This morning, the fog is heavy as we set out. Dog has already been disappointed by the drive-thru bank teller who has failed to dispense the requisite milk bone with the return of my deposit slip. She, Dog, doesn’t know yet that the universe will be restored with the slice of American cheese proffered by the woman who will buffer my own reentry with a 12 oz dark roast. This will happen, by the way, in about an hour and a half, at the crest of Mountain Rd, where the sun will have broken through the clouds.

In the meantime, the water is high, where we walk along the Mill River. It’s been a spectacular season for fungi of all stripes. The late corn crop sits with its feet in a transient lake and someone has decorated a trail side hemlock sapling with Christmas ornaments.

IMG_2051

IMG_2048

Beyond the woods and back into the farm fields, Dog tolerates my need to poke and ponder. “Oh, jeez, she’s got the camera out again”. We have an understanding. I indulge her nose and she indulges my eye. But I wonder, does she think in metaphors the way I do?

IMG_2057

Maybe not. Today, among other unexpected things on a frequented path, there is a farm harrow mired in the mud alongside the trail. A lovely blue in a palette of greys.  Oops, nasty flat tire. I wonder if the farmer will be back to extract it before the earth is frozen, or will complacency set in, or other unavoidable priorities. I’m heading home now. I can feel my brain shifting. I have a lot of work to do, an increasingly unpredictable environment and a disgraceful president.

IMG_2055

We walk here a lot. Sometimes the corn crop is a sunflower crop. Sometimes the path is snowy or icy, almost impassable. In the spring, hard to imagine now, the fields are spread which such a delight of richness and promise that there is nothing to be done but roll in it. Always there is the river, the woods and a way forward.

IMG_2064


At one end of the spectrum is the mixed metaphor – relatively harmless, but wrong. At the other end is the potentially deadly* mix of seemingly tame cleaning agents found under many a kitchen sink – ammonia and chlorine. The back story here is that when I was in fourth grade (ancient history, I know), a classmate of mine’s brother landed himself in the hospital, having torched his respiratory system, and not by spouting mixed metaphors.

Somewhere in the middle of the spectrum lies the conventional wisdom, luthier version, that if you introduce a metal structural element into the wood and glue universe of the violin, you are asking for complications, eventually. There are inconvenient exceptions, of course, but as far as I know, they appear only rarely in the context of making. Violin making, that is.

As far as restoration goes, screws, nails, metal anything – big no no. For one thing, we don’t want to disrupt the synergy between various parts of an instrument by relying on a material, so radically different, that it won’t move with the wood. Secondly, it’s hell when you hit a screw with the chisel you just honed to a razor edge.img_0676

Recently, a project came to me that might have been a straightforward neck and button graft. Is there something on that Restorer’s Mind page about “a never ending stream of firsts”? I may have to edit, if not. This 18c Testore family cello had at some point had full edging replacements, top and back, attached all around with glue and small nails. It’s possible that purfling (characteristically only etched in) was added to disguise the joint. When I began this project, the neck was broken, the button compromised and the upper back edges were a mess.

DSCN3232.JPG

When I started removing deteriorated wood, this is what was left! I found it useful to go exploring with a magnet, before committing my nicely sharpened tools to wood.

dscn3246

It might not be possible to know the circumstances that resulted in this odd and unlikely wedding of wood and metal elements. The edges were not underlaid, but simply glued and nailed with the aid of some judicious kerfing  on the interiors of the more extreme curves. When? Long enough ago for the upper back edges to deteriorate dramatically.

I replaced those edges with new wood underlaid into the back in a manner that would preempt the need for additional, need I say, nefarious reinforcement. Much more comfortable for the player, I should think, and easier on the sweater, too!

dscn3252       dscn3253 dscn3254       dscn3258dscn3296       dscn3300dscn3310       dscn3321dscn3378       dscn3387

*I do not, in fact, know if this chemical combo is deadly. But to the 9 year old brain, it was a sensible conclusion.

And about the nails, there are plenty left in the c bouts, and the lower bouts to provide many years of puzzlement and consternation to future restorers.

Soundpost patch? Huh?

Whenever I have to tell a client that their instrument is in need of a soundpost patch, I am prepared to provide an explanation. Usually that means pulling up a portfolio of photos, or even reaching for an actual project undergoing the procedure.

A patch is the correct repair for a crack running through the soundpost area. For the purpose of this essay, I’m referring to a crack in the top of the instrument. Cracks in other areas of the top may be reinforced by the installation of small cleats to the surface of the wood, like this:

DSCN2046 - Version 2


A patch is a more invasive procedure, but the location of a crack in the soundpost area necessitates its implementation. Wood that is compromised by a crack or, as we will see, worm damage, will be vulnerable as it’s subjected to the downward pressure of the bridge, and the upward pressure of a properly fitted soundpost. In addition, the area must be free of protruding cleats so that a soundpost can be installed and its placement adjusted as necessary.

A patch requires removing damaged wood and then inserting healthy wood which is shaped flush to the surrounding area. In the end it looks like this:

DSCN2181 - Version 2

A recent project of mine provided an opportunity to take some illustrative pictures. This violin did not have a crack so much as it had a concentration of worm runs in the soundpost area. Thankfully, this little worm exercised its voracious appetite mostly below the varnished surface, so a patch was the appropriate remedy. As an aside, remediating worm damage is a topic that inevitably provokes animated, or shall I say agitated, discourse among my colleagues, frequently followed by the consumption of copious amounts of alcohol.

Careful planning is the first step in assuring a successful repair (violin restorer Truth #1). I have seen patches fail because they were poorly planned and/or poorly executed. Here’s one that suffered on both accounts:


DSCN1523


DSCN1532

The forward edge of the patch did not hold, leading to serious sinking in the bridge area.

So back to my current project. Here is how I planned the patch, so that the bridge and post would be situated at the strongest point. Some of the worm runs are visible where they had been filled by a previous repairer.

DSCN2166


With the top of the instrument fully supported by a plaster cast, damaged wood is carefully removed, creating a kind of bathtub shaped concavity. When I’m done, it measures .5mm at it’s thinnest in the center – thin enough to see light radiate through when held in front of a lamp. Photo bomb by the ex-worm that shall not be named.

DSCN2169 (1)

New wood is chosen to match the old. The patch wood is oriented so the grain lines up nicely with the original. Rough fitting of the new wood is done with a sharp knife or chisel. A dusting of chalk in the patch bed helps reveal high spots as the patch approaches its final fit. Final fitting is done with a very sharp scraper, eliminating any ridges or high spots left by the knife. Small cleats, temporarily glued to the instrument top ensure that the patch is placed in exactly the same position as it’s being fitted and then, as it’s glued in.

DSCN2172

DSCN2175


DSCN2179


When the patch is fitting perfectly, the surfaces are brushed free of chalk and it’s glued in with hot hide glue. Later, the cleats will be removed and the new wood will be shaped down to a thickness consistent with the surrounding area. Here’s the finished patch. I’ve added a couple of  cleats at either end where the grain runs out, for extra reinforcement.


DSCN2280 - Version 2


This is a very straightforward sound post patch. Since the damage did not migrate through to the varnish side, there was only a small bit of filling and retouch to achieve an excellent result.

Just a few last words about soundpost patches in violins. An instrument with a well-executed patch in the top can be a very healthy instrument indeed. (Please note – a patch in the back may warrant a different kind of consideration, but that’s another topic). An instrument with a soundpost patch in the top is not going to suffer tonally. If anything, healthy wood where there was once deterioration and/or damage is more likely to restore the integrity of the structure, and hence, facilitate a favorable tone production.


RM Visits the Victory Theater

Recently, an opportunity presented itself and this restorer’s mind had to say yes.

On a chilly Saturday morning in late September, a handful of adventuresome photo nerds (including myself) were granted access to the long abandoned Victory Theater in my home city of Holyoke, MA. The event was offered by MIFA (owners of the property), Matt Christopher’s Abandoned America and Matt Lambros’ After the Final Curtain. Access to the building was intriguing enough, but tutelage from a couple of fine photographers made it a rare deal. My motivation was to learn some new things about my camera, the same one that I use regularly in my workshop. I have long been convinced that my little Nikon Coolpix is smarter than I am and anything I can do to reduce the disparity is valued highly. The venue was a real bonus, appealing at once to my odd attraction to decrepitude and the promise inherent in a possible restoration. Throw in a little Nancy Drew, a little Doctor Who, a fascination with urban spelunking and love of alternate realities, and you have a stew that pretty much describes my morning. I had fun.

The Victory Theater is thrice renowned for what it was, for what it currently is not, and for what it might still become. Opened in 1920, it was a vaudeville house in a thriving manufacturing city. By the time it was condemned in 1979, even its life as a movie theater was over as Holyoke suffered a huge economic decline, along with too many other post-manufacturing cities in America. The Victory is currently owned by the Massachusetts International Festival of the Arts and there is a campaign in place to procure funding to restore this cultural/architectural treasure. Take a look. If you’re curious, check out the links. Think about contributing.

Click on an image to start the show. And thanks for indulging me. More about fiddles next time.


Christmas Eve 2013DSCN1079

While I am upstairs reading a post from a friend whose dog just “discovered” the Christmas ham as it was  stored out on the porch, my own Dog is downstairs hovering over the remnants in the cat dish. Dinner has already been served, and yes, I am distracted, especially since it’s Christmas Eve and I don’t want to find in June, the stocking stuffers that I am dangerously close to forgetting about right now.

And there was something that desperately needed to go in the attic. And, in fact, something that wanted to come down, but I can’t remember what.

So when I finally return to the kitchen, Dog is still engaged in the waiting game. She stands over the cat  dish, her head hanging and her eyes somewhat glazed. Her eyebrows bob. This has nothing to do with any rules I am aware of. She will wait until I spoon the leftovers into her own dish, and then have at it like the scavenger that I know she is. This behavior has always bewildered me, but I happily go along with it.

I’ve had dogs before, and I’m reminded in particular of a dear Golden Retriever who would cozy up to a dumpster as soon as she would hop onto the couch. This dog of mine right now, Saint Dog, as I imagine her because of her unworldly display of “patience”, is a different sort.

It’s true that, I myself have been accused of having the “patience of a saint”. I have a long history with Catholicism, so I should know what that means. However, a moment of doubt (!) sends me to the dictionary. A quick search reveals only a reference to Job and his nagging wife. Well, screw that.

If I were to attempt to boil my observations down to something meaningful (in fact this is what I try do every day), today’s lesson would be that Patience = Faith in a Positive Outcome. As an alternative, Grab the Ham!

Have a Merry Christmas Everyone, wherever you are!

3 Things

Three things have engaged my attention this week. Granted: I am easily overwhelmed by the state of the world, and though I do my best to keep myself generally informed, I find that I function best when I am able to concentrate my energies and my attention on my community, my friends and loved ones, and my work.

This perhaps belies my past as an activist. While my stance on social change has not wavered, my personal approach has, in fact, changed.  Lest my intentions be deemed petty, or trite, I would challenge anyone to grasp the correlation between these 3 items of interest:

1. My city of Holyoke, MA opens a brand new skateboard park. Btw – Holyoke’s new skate park also happens to be situated in Pulaski Park, designed at the turn of the 20th century, by Frederick Olmstead :

1002595_505039666253361_683139868_n

2. Residents and friends of Holyoke petition to save an historic building:

The Farr Mansion then:

VtBIkIrThJnmbZc-556x313-noPad

And now:

156643_359506447476988_635337230_n

3. I spend the better part of three months working on a 17th century fiddle:

DSCN0602

Clearly, this is not simply a pedantic interest in saving old stuff. I like old stuff. But more importantly, I see that an investment in the future is predicated by carrying the past forward. I am never more in touch with this truism than when I am at work. While my current patient was created while Monteverdi was still freshly in his grave, I am aware that, in its reincarnation, it will just as likely be called upon to perform Schnittke’s Concerto Grosso No.1 .

And so, a skate park, in some odd way, makes good sense to me: an underutilized and yet historically significant park becomes a hot spot for serious play. Our kids. Our future.

As for the Farr Mansion, that is yet to be determined. My hope is that Holyoke with grasp it in its hands and bring it, too, into the future.

1010260_505046312919363_1147131055_n


Thanks:  Rob Deza Photographer

Occasionally, I have a job come in that seems to make an extreme sport out of basic violin maintenance. This is the kind of job that I prefer to turn over quickly, since my clients are serious musicians, and most find it difficult to be parted with their instruments for any length of time. Usually, it doesn’t even occur to me to take out my camera, because, let’s face it, fingerboard planing is so “ho humm” for us fiddle fixers. Which is NOT to say that it doesn’t require absolute skill and precision to execute properly! In that it is a basic procedure, it is a little like buying new tires for your car, although having your fingerboard planed will probably cost less and yield results that you will actually notice. I hate buying tires for my car.

I’m making a serious comparison here!  The fact is that driving your car and playing your instrument both impact the surface in play. In the former case, we replace the tires when excessive wear is evident, or else we call the DPW:

images-2

In the latter case, we develop superior finger callouses, and then resurface the fingerboard as needed.

Excessive wear in a fingerboard can manifest as ruts, caused by pressing the strings against the surface of the fingerboard, and as pits between the strings, where the player’s fingers, with their superb callouses, land. A quick sighting down the neck reveals the telltale washboard effect.

DSCN0610

Closer inspection shows serious pitting and string ruts all the way up the fingerboard.

DSCN0611DSCN0614

This is lovely old German cello is a pretty extreme example – perfect for demonstration purposes! The fact is that fingerboard wear happens gradually. Often the player makes subtle adjustments over time to compensate for the discrepancies in the playing surface. The informed player knows to have the board checked periodically, and may even detect the symptoms of a worn board before it becomes unmanageable. Everyone else just blames the soundpost!

It’s true, the soundpost seems to take the blame whenever something mysterious is happening with an instrument. That’s  why a good luthier is also a diagnostician. A worn fingerboard can cause buzzing, obviously, but it can also result in the loss of clarity in tone production. And, it can wreak havoc with intonation. Can’t seem to nail those fifths anymore? Hmmm.

Fingerboards are generally made out of ebony – a very hard, dense wood that is black, sometimes with paler streaks. The fingerboard is meant to be resurfaced as needed. I have some clients that have this done every couple of years. Others go longer. Sometimes, as in the case of my German cello, MUCH longer!

The shape of the fingerboard is carefully calculated. From end to end it has a gentle “scoop” which enables the  string to vibrate freely from whatever point it’s fingered. Too little scoop and the string buzzes, too much scoop and the string is difficult to press down. The arc across the fingerboard is also shaped precisely, using a template. The fingerboard arc needs to correspond properly to the bridge arc, so that the player experiences comfortable and even fingering.

The fingerboard is shaped with a sharp plane. The first few cuts into a badly worn board are always revealing.

DSCN0616DSCN0622

Here, I’m checking the arc against my template.

DSCN0625

To evaluate the scoop, I first use a long straight edge. Then I use a short straight edge to detect any discrepancies. I like to see a sliver of light under the short edge, all along the length of the board. That’s my favorite  plane for the job – it’s a Lie-Nielsen block plane. I start with a heavier cut. Then, as I approach the desired shape, I back the blade off and proceed with a very light cut. This leaves a minimum of finish work to do with a scraper and fine sandpaper.

DSCN0632

The fingerboard is polished with mineral oil and a bit of tripoli for a smooth, consistent surface.

DSCN0636DSCN0634

An accurate fingerboard can make a huge difference for a player. One happy client, Rebecca Hartka, had this to say recently:

Playing in tune is suddenly soo much easier since I just had my fingerboard smoothed down. It’s amazing to me that putting my fingers down over and over again can literally cause dips in my ebony fingerboard! And how much mayhem a wobbly fingerboard can cause in note consistency. Thanks Stacey Styles for the beautiful job! Phew!

DSCN0645

All dressed up now, and ready to go!

Free_iPad_Wallpaper__Includes_the_Scene_of_Highway_Makes_One_Feel_Fast_Speed_and_Great_Driving_Excitement

Hah! Discovered this little collection of violin, viola and cello mutes while I was cleaning out some drawers:

DSCN0524

Rosewood, boxwood, ebony, metal, plastic. Waverly, Ton-Wolf, Geschützt, Made in Germany. Some are weighted. One has an A pitch pipe. Arranged on a nice piece of Bosnian maple, hand carried from Ciresa, in the Dolomites. Maybe I’ll make a fiddle out of it someday.

Being a restorer is a little like jumping into a movie mid way. First, you have to figure out what’s going on. Then you have to keep the plot interesting, the characters viable, the scenery and costumes true and the concept and signature in line with the filmmaker’s. All this without knowing for how long, or to what outcome, because you’ll be jumping out again before the credits. Hopefully, no one will know you were even there, but in your old age, perhaps you will be lucky enough to lean back and in your mind’s ear hear that resounding chorus, “Wow that was a great flick!”, and know you had some small part in it.http://www.youtube.com/watch?v=RaxVwD-HvNU